
TL;DR: Space your ball transfer units so the smallest load always sits on at least three balls, drill the mounting holes to the manufacturer’s pattern, and torque the fasteners to spec for whatever you’re bolting into. Keep the height alignment inside ±0.5mm and double-check load direction before you cinch anything down.
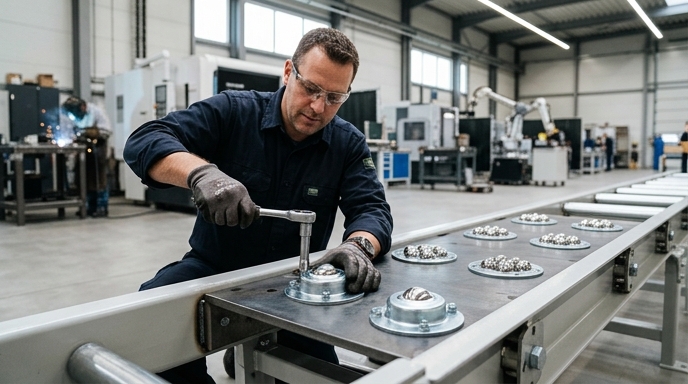
Before You Drill: The 3-Ball Contact Rule That Sets Your Spacing
Ball transfer units have to be spaced so the smallest expected load touches at least three balls at all times. If a package ends up balanced on one or two, it tips, digs into the plate, and jams the line. I’ve watched a whole repack cell go down for a shift because somebody spaced the units off the biggest tote in the catalog instead of the smallest.
To find the maximum center-to-center spacing, take the narrowest dimension of your smallest package and divide by √2 (roughly 1.414). The geometry guarantees that no matter how the package rotates on its way through, its footprint covers at least three units. So if your smallest tote is 150mm wide, 150 ÷ 1.414 = 106mm, and that’s your spacing ceiling.
| Smallest Package Dimension | Max Center-to-Center Spacing |
|---|---|
| 100mm | 70mm |
| 150mm | 106mm |
| 300mm | 212mm |
| 500mm | 353mm |
One thing the formula doesn’t tell you: if your product mix is wildly inconsistent (think a DC running everything from jiffy bags to 40lb totes), spec off the smallest realistic SKU, not the smallest possible one. Otherwise you end up with a table full of BTUs on 50mm centers and a parts order that gives the CFO a heart attack.
Choosing the Mount Style for Your Substrate
Which mounting hardware you use comes down to base material thickness and load.
- Stud-mount: threaded stem, fast to install, needs a rigid substrate. Run these through sheet metal under 2mm without a backing washer and you’ll get tear-out the first time something heavy lands wrong.
- Flange-mount: drops into a clearance hole, held down by two or more top fasteners. This is what you want for heavy loads and thick steel plate.
- Drop-in (tolerance ring): press-fit into a precision-bored hole, held by friction. Useful where unbolting a unit for replacement would eat the whole shift.
- Weld-on: plain carbon steel base. Permanent installs where vibration would walk a nut loose eventually.
Weld-on sounds great until you need to replace one.
Drilling and Hole Pattern Preparation
Hole prep is where most sloppy installs start. The unit has to sit dead flat against the substrate or nothing downstream will go right.
Stud-mount gets a standard clearance hole: 8.5mm for M8, 10.5mm for M10. For flange-mount, stick to the manufacturer’s bolt circle diameter and don’t eyeball it off a tape measure.
Deburr every hole. This is the one I see guys skip because it’s boring and nobody’s watching. Leave a burr on the top edge and the housing cocks over by a degree or two, which is enough to put the main ball out of plane with its neighbors. Then the unit drags instead of rolls, the package hesitates, and three months later somebody writes a work order claiming the bearing failed. The bearing didn’t fail. The hole did.
Mounting Procedure Step-by-Step (Top-Load Orientation)
Standard torque for an M8 BTU stud in steel is around 15 Nm. Over-tightening kills more of these units than any load ever will.
- Dry-fit everything. Drop all the BTUs into their holes without tightening anything down.
- Thread-locker if you need it. For high-vibration environments, one drop of medium-strength blue (Loctite 243 or equivalent). Don’t use red. BTUs are wear items and you will be back here.
- Torque to spec. M8 at 15 Nm, M10 at 30 Nm, both in steel. Knock those numbers down by about 30% if you’re going into aluminum, or you’ll pull the threads.
- Cross-pattern on flange mounts. Diagonal, like a wheel. Seats the housing evenly instead of pulling it to one side.
That’s it. It is not a complicated procedure, which is why it is so routinely botched.
Inverted and Angled Installations (The Hard Mode)
Standard ball transfer units use gravity to keep the big load ball seated against the smaller support balls inside the cup. Flip one upside down and the main ball either falls out or jams against the retaining ring. Obviously you wouldn’t try that with a bulk-bin BTU, but I’ve seen it attempted more than once on smaller units where somebody figured the retention lip would hold.
For inverted mounting, you need units built with internal retention clips or spring-loaded cages. Omnitrack’s 9000 series and the Alwayse Hevi-Load line are built for overhead, ball-down work. There are others, but those are the two I keep coming back to.
Angled mounts are a different problem. Mount a unit at 90 degrees to guide the side of a package and your load capacity falls off a cliff — manufacturer datasheets commonly call for a 50% derating, because now the side load is pushing the main ball against the housing lip instead of against the internal support balls. I’ve seen numbers in the 40–60% range depending on the model, so pull the actual load curve for whatever you’re specifying rather than trusting a round number from a blog post. Including this one.
Alignment and Height Coplanarity Between Units
Every unit in the grid has to sit at the same height. The working tolerance across a transfer table is ±0.5mm, give or take depending on who you ask.
Here’s why it matters. If one unit sits 1mm proud of its neighbors, it becomes a pivot. A rigid package rolls over it and that one unit eats 100% of the local load for the duration of the transit. That’s instantly past its dynamic rating, and the internal ball cage crushes. Not “wears out.” Crushes. You pull the unit a week later and the cage looks like somebody stepped on a soda can.
Use a precision-ground mounting plate if you can. If you’re retrofitting onto a welded frame that’s been sitting in a plant for fifteen years and has the flatness of a potato chip, shim with stainless slotted shims under the flanges and check across the grid with a machinist’s straightedge. Not a level. A straightedge.
Sealing, Debris Protection & Environment-Specific Installation
Open-cup BTUs die fast in dirty environments. Dust and liquid get past the main ball, pack the support bearings, and the unit seizes.
For washdown — food, pharma, anywhere that gets hosed down at end of shift — spec units with nylon scraper seals and AISI 420 or 316 stainless balls. The scraper acts like a gasket, wiping the main ball clean on every rotation. I still spec 316 for freshwater washdown even though 420 is usually fine. Old habit, not strictly justified, but I’ve never had one come back on me.
For dusty environments like a warehouse dock or an outdoor transfer point, specify units with a dirt-exit hole in the bottom of the housing. Dry debris that drops in up top falls straight through instead of packing the cup.
Post-Install Testing & Common First-Week Failures
After install, roll a reference package across the grid in multiple directions. It should move with almost no effort. If you’re leaning on it, something’s wrong.
Listen for grinding and feel for drag. First-week failures are almost never defective bearings. They’re installation errors, and the single most common one is over-torquing flange mounts. Crank a flange nut down past spec and you distort the stamped housing, which squeezes the ball cage, which eats the operating clearance. The main ball drags, then seizes, usually within the first few days.
If a unit’s dragging right out of the gate, back the fasteners off, look at the housing for visible deformation, and re-torque properly. If it’s already deformed, replace it. You will not save a crushed housing by loosening it.
Frequently Asked Questions
How do I calculate the correct spacing for ball transfer units?
Take the narrowest dimension of your smallest package and divide by 1.414. That’s your maximum center-to-center spacing, and it keeps the package on at least three balls regardless of orientation.
Can ball transfer units be mounted upside down or at an angle?
Not with standard units — the ball drops out or jams. For overhead work you need inverted-mount models with retention clips (Omnitrack 9000, Alwayse Hevi-Load, etc.). Angled mounts are possible but derate significantly; a 90-degree wall mount typically costs you around half your rated capacity because the side load is pushing the main ball against the housing lip instead of the support balls underneath. Always pull the load curve from the specific manufacturer’s datasheet before you commit to a layout, especially if you’re mixing orientations in the same cell. Guessing here is expensive.
What torque should I use when installing ball transfer units?
M8 stud in steel, 15 Nm. M10, 30 Nm. Knock about 30% off those numbers for aluminum.
How do I replace a failed ball transfer unit without re-drilling the mounting plate?
Pull the dead unit, wire-brush the hole clean of rust and debris, drop in the same model, and shim it with stainless to match the height of the worn units around it. The shim step is the one people skip, and then they wonder why the new unit is doing all the work.
Leave A Comment